The definitive guide roasting for Roasting Coffee at Home
Aug
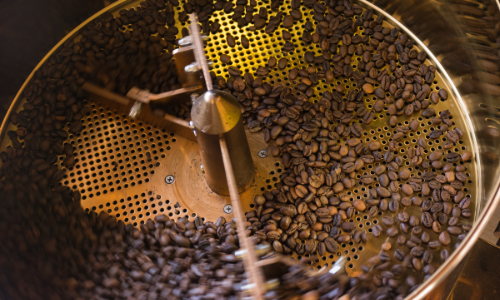
Coffee Roasting
Roasting your own coffee is one of the best ways to enjoy it. You can guarantee fresh coffee every time you roast coffee at Home. With a little practice you can also ensure the coffee is exactly to your liking.
You can find the right coffee at your local roaster or coffee shop, but why not roast your coffee in your own kitchen?
You will need some supplies and green coffee beans to roast coffee at home. Understanding the entire process from beginning to end is important so that you can understand how it can affect the flavor of your coffee.
What is coffee and why do we roast it?
Coffee is actually a small, red fruit that has to go through several stages before reaching your cup every morning.
The outer skin, pulp and inner parchment skin are removed first. After that, the inner seed (also known as the coffee beans) is removed.
It becomes the green coffee bean after it has been dried. This green coffee bean is then shipped all over the world to be roasted.
Coffee beans are similar to pinto beans in that they can be stored for long periods and still remain fresh after it has been roasted. The coffee would taste bitter and extremely acidic if it wasn’t roasted, which makes it almost undrinkable. Coffee gets its unique flavors and aromas from roasting.
WHAT HAPPENS DURING COFFEE ROASTING?
The roasting process can change the color of green coffee. Roasting coffee causes the beans to shrink and dry out.
Some of the natural sugars will be converted to CO2 gas, while others will caramelize into the flavors that make up the complex flavors of the coffee. The green bean will become a brown bean, which is approximately 18% lighter and 50 to 100 percent larger after the process is completed.
Once the roasting process has ended, the coffee starts to “degas” and within a few weeks, some of the flavor and aromas will be gone.
ROASTING COFFEE: THE 10 STAGES

Coffee experts have identified ten levels of roast beans can (but should not) experience. It is up to you which levels you choose:
Green Even when they heat, the beans will keep their original green color.
Yellow The beans will turn yellowish and emit a grassy smell.
Steam The beans will produce steam. This is caused by the water in the beans drying out.
First Crack (Cinnamon Roast).This is where the true roasting starts. The sugars in the beans caramelize and produce a crackling sound similar to popcorn popping.
City Roast: After the first crack, the beans reached City Roast. This is the minimum roast that can be used for most people’s grinding or brewing preferences.
City Plus Roast The beans reach City plus Roast after further caramelization and oil migration. This is the most popular type of roast.
Full City Roast The Full City is a darker roast than City Plus, which takes the beans to the brink of a second crack.
Second Crack (Full City Plus): After undergoing a second, more severe cracking process, the beans enter Full City Plus. This roast will add more intensity to the flavor.
Dark Roast (French Roast).The smoke will be pungent and the sugars will burn as long as possible without affecting the flavor. Additionally, the overall structure of the beans will begin to fall apart. This is the limit of roasting beans within the limits of good flavor.
Burn: If you don’t stop roasting beans by this time, the smell can turn from pungent and horrible, and your beans will start to burn.
It is also important to remember that different charts may include different roast distinctions. We only included those that are distinctive to the roasting process.
DARK ROAST VS. LITERARY ROAST
Different people have different preferences about where their coffee roast should be placed on the stages. They might not even know all the names. The most common and basic denominations used to distinguish the stages are: Light, Medium, Medium Dark, and Dark Roast.
There may not be any differences in how to roast a Full City or a Full City Plus, as they are both Dark Roasts. There are some differences in the roasting process of a City and a French Roast.
The internal temperature of beans roasts increases. With that rise in temperature comes different considerations. The internal temperature of the beans at the time they were removed from the roaster is often a key factor in determining the type of roast. Let’s now take a look at the temperature you should heat the beans to achieve the desired roast.
LIGHT ROAST
A light roast is one that has an internal temperature of 356-401°F. Light roasts can be called light city or half-city, as well as cinnamon roast. They tend to drop around the first crack, regardless of their name. The bean surface may still be dry at this point and beans could become very hard (especially if removed before the first crack).
This type of roast is for those who prefer a stronger, brighter brew with a lighter body. This type of roast is safer to make at home because it takes less time and requires a lower temperature.
MEDIUM ROAST
Medium roasts (including city and city+) should be roasted at 410-428deg F. Although the beans will retain a dry surface, they are easier to distinguish from original green beans. This is the point at which the beans are ready to be roasted. A medium roast is defined as anything that falls between the first crack and the second crack.
Because of the higher level of acidity and fuller flavor, this roast level is much more popular than light ones. The temperature is still manageable.
MEDIUM-DARK ROAST
This category is slightly larger in terms of the number of roast distinctions it contains (including Full-City, Full-City+ and sometimes Vienna Roast). It is also smaller in terms temperature window. Medium-dark roasts can reach temperatures of 437°F to 446°F. As the beans get closer to 2nd crack, you may notice oily patches.
This is when the roast flavors start to dominate alongside the varietal notes. It creates hints of spice as well as a heavier body.
DARK ROAST
French Roast, Italian Roast, or Espresso Roast are all available. All are dark roasts. They are roasted at 464 degrees F, but it is best to roast them below 482 degrees F. If you don’t have the right equipment, this is where things can get complicated or even dangerous. These beans will have a very oily surface with low acidity. They are removed during the second crack.
This is where roast character can be considered to outweigh origin character in terms of flavor. Anything above this point can lead to fire and burnt taste, so be careful if you choose a darker roast.
COOLING THE BEANS, REMOVING CHAFF
The coffee beans will begin to lose their outer skins during roasting, leaving behind what is called the chaff.
Take 2 colanders to remove the chaff. Once you have finished roasting, pour the beans into the colander. To remove the chaff, continue to move the beans between the colanders. Don’t be discouraged if you don’t manage to get it all.
As long as the chaff is small, your coffee will not be affected by it.
3 THINGS THAT YOU MUST DO TO ROAST YOUR OWN COFFEE AT HOME
To properly roast the coffee, you will need some supplies.
Green Coffee This could be the hardest part of your roasting process, depending on where you live. Look for roasters that offer unroasted coffee beans in your local area.
Roaster There are many types of roasters available. Even a simple one can be quite versatile. Popcorn The job can be done by any maker. We will show you how to roast and which type of roaster is best for the job.
Storage– After you have roasted your coffee, you’ll need somewhere to keep it until you are ready to use it. The more airtight the coffee, the better. Even the best coffee containers won’t stop the coffee’s flavor and aroma from deteriorating after about one week.
Once you have all the necessary equipment, it’s time to start roasting. Remember that roasting beans at temperatures between 370°F and 540°F is essential for success.
Roasting beans should ensure that they remain in motion throughout the roasting process to prevent them from becoming scorched. Also, roasting produces a lot of smoke so make sure your home is well ventilated. Otherwise, you may find yourself in a very smoky environment.
How to make a roast coffee with a machine for roasting
It’s easy to find a coffee roasting system that can handle your coffee roasting needs. These machines work in a similar fashion to a popcorn popper. They use hot air fast to roast the beans, and keep them agitated during roasting.
This roasting method is the easiest because the roaster does most of the heavy lifting.
WHAT YOU WILL NEED:
- Coffee beans in green
- Coffee roaster that is purpose-built
- Colander
- Wooden spoon
Start your coffee roasting journey by visiting your local coffee roaster and purchasing a few green beans. Don’t be afraid, even if you don’t have a lot of coffee knowledge, to ask questions. We are certain that the roasting experts will give you sound advice to make the most of your beans.
Once you have what you need, pour the right amount of coffee into the roaster.
TURN ON THE MACHINE.

Turn on your coffee roaster and let the beans roast until they reach the desired color.
We can’t tell you exactly how this will go as each machine is different. You shouldn’t have any issues if you carefully read the instructions.
To avoid any malfunctions, you’ll want to keep an eye on the roaster. Remember that the darker and more robust the coffee will become the longer it is roasted.
After the beans have been roasted, it’s time to bring them back to room temp. There are a few options to do this. You can transfer the beans between two colanders to cool them down. Or, you can use a wooden spoon or a whisk to stir them until they are no longer warm.
After the coffee beans have cooled, let them air out for 12 hours to release CO2. Then, seal the canister and store them in an airtight container. Keep the beans at room temperature away from moisture and sunlight, such as a pantry shelf.
HOW TO ROAST COFFEE BEANS Using A STOVE TOP POPCORN MAKING MAKER
People used to roast coffee beans on the stove before the inventions of popcorn poppers and coffee roasters. A stovetop roaster is basically a pot with lid that can be easily stirred.
WHAT YOU WILL NEED:
- A Whirley pop Stovetop Popcorn Maker
- An outdoor burner (gas or electric)
- Coffee beans that have not been roasted
- Optional: A laser thermometer
- A baking sheet
- An airtight container
Stop by your local coffee shop and pick up some unroasted green coffee beans. Ask for suggestions on how dark you should roast the beans. However, you should not be afraid to experiment and learn how to roast beans to your liking.
Once you have gotten your beans, move the picnic table to the side and place your burner, popper and baking sheet. The Whirley pop should be heated to 400 degrees. The best way to determine the temperature is with a laser thermometer. However, pre-heating the Whirley Pop for between 5-10 minutes should get it in the right range.
After the popper has reached temperature, add the beans to the handle and crank the handle. To roast evenly, you’ll need to keep the beans moving throughout. So crank on from start to finish in a steady, even pace. This is a labor of passion.
The heat will roast the beans as you crank. As they roast, you’ll be able to see the transformation from raw coffee seeds into deliciously fragrant and flavorful beans. It only takes a few minutes for the perfect roasted coffee to become perfectly ruined.
-
ROAST THE COFFEE BEANS
The beans will go through many stages as they roast. The beans will go through several stages as they roast. You can see how they transition from raw to ground-and-brewedable and then decide how you want them to taste. Pay attention to the whole process. This will allow you to control the taste of your coffee and to master how to prevent them from burning.
There are ten different stages. Each stage can be identified as you roast the beans, with the exception the tenth. This stage should be avoided as it can lead to over-roasting perfectly good beans.
Once you have the desired roast, place the beans on a baking sheet. Then, shake the baking sheet and let the beans cool in the breeze. You’ll be ready to store depending on how dark your roast is.
After the beans have cooled, place them in an airtight container. Mason jars work best as they provide a perfect seal. We recommend that you allow the beans to cool for 12 hours if the roast is Full City- or darker. This will allow the gasses to dissipate and the beans to be stored dry.
The rest is left to do: grind, brew and enjoy the day’s coffee roasting. You can have great, home-roasted coffee in just 20 minutes.
How to roast coffee beans with a hot AIR POPCORN OPPER
A popcorn popper is a simple way to roast coffee. It is recommended for beginners who want to begin roasting their own beans.
It only takes a few minutes and you can experiment with the roast. You can make it light or dark, and you can do it all. Roasting your coffee in your own machine is a great way to turn it into an experience.
WHAT YOU WILL NEED:
- A hot air popcorn popper
- A bowl
- Coffee beans that have not been roasted
- Optional: A thermometer
- A baking sheet
- An airtight container
Begin by making sure you have all of the items in the list. For raw, unroasted beans, visit your local bean dealer. They love to hear that you call them that. Ask for a variety of beans and how dark they are roasted by your trusted baristas.
You will need to have enough counter space at home for the popper, bowl, and baking sheet. Turn on the popper and heat for approximately 30 seconds.
Add 1/2 cup of beans to your vessel once the popper is hot and bubbly. Although the whole roast takes about five minutes, you will need to be there to watch the beans as they progress through each stage. Do not leave the popper unattended.
-
ROAST THE COFFEE
The beans will go through many stages as they roast. The beans will go through several stages as they roast. You can see how they transition from raw to ground-and-brewable and then decide how you want them to taste. Pay attention to the whole process. This will allow you to control the taste of your coffee and to master how to prevent them from burning.
Once you have achieved the desired roast, turn off the popper. Then spread the beans on the baking tray. This will allow them cool down quickly. To speed up the cooling process, give the sheets a shake. Wait until they cool completely before storing.
After the beans cool down, it’s time to put them in an airtight container. Mason jars and tinted OXO containers are our preferred storage options. If you roast the beans Full City Roast or darken them, it is best to let the beans sit for 12 hours before you store them. The gasses in the beans will dissipate faster.
After the beans have been cooled, it is time to grind them and make the first cup. Enjoy the results of your labors. Take your time. Take a look at the different roast levels to see what you can get from the beans. Once you master the art of popcorn making, you will never look at it the same way.
HOW TO ROAST COFFEE BEANS WITH AN Oven
The last but not the least, a home-roasting method is simple and requires only one tool: your oven.
Attention: This method can get very smoky so make sure you have a working smoke alarm and open your windows for ventilation.
WHAT YOU WILL NEED
- A high-temperature oven
- Perforated cookie sheets or oven tray
- Colander
PREHEAT THE Oven AND PLAN THE BEANS.
Pre-heat your oven to between 450 and 500° Fahrenheit. While the exact temperature that you should use will vary from oven to oven, and depend on whether your oven is gas or electric, our research revealed that oven roasting happens at this temperature.
Spread your beans on a cookie sheet while the oven heats. To ensure even roasting, don’t stack your beans.
BAKE THE BEANS
Time for some baked beans! (No, that’s not the …) After the oven reaches the desired temperature, place the pan of coffee beans on the shelf of your appliance and close the door.
Make sure to use both the light and window on your oven so you can see all the action. Attention is crucial here. You don’t want any of your coffee beans to go bad!
LISTEN TO THE CRACK
The beans will darken as you watch them roast, or if there is no oven window, you can twiddle your thumbs. It’s not only a change in color that indicates a finished roast, but also the sound. You’ll hear the first crack after a while — your beans have been lightly roasted at this point.
If you let them roast beyond this point, they will give off a second crack. You’ve guessed it, this means that you have a medium-rare roast. If you want a medium roast, bake them for about one minute more, and then take them out of the oven.
If you prefer darker roasts, you can roast the beans for a longer time. However, if you leave the beans to roast for too long, they will be done in no time.
COOL THE BEANS
After your coffee reaches the desired roast level, remove the beans from the oven. Once they are cool enough to handle, transfer the beans to a colander and shake gently until they reach room temp.
The best way to do it is outside or over the sink as it will make a mess. It’s important to wear oven mitts because it will be very hot.
DE-GAS BEFORE YOU BREW
After the beans have cooled, allow them to remain exposed for 12 hours to let the carbon dioxide escape. Your beans are now ready to be brewed.
READ BEFORE YOU EAT
These are just four ways to roast coffee at home. You can roast the beans on a grill, in a pan, or over a campfire for those who are more adventurous. There are many options, provided you have good containers and a heat source to roast the beans.
It is easy to roast coffee at home. You can experiment with different roast times and methods until you find the perfect roast for you.
Before you start to roast your beans, here are some questions you need to answer.
WHAT TIME DOES IT TAKE TO ROAST COCOA BEANS?
There are a few factors that determine the roast time of coffee beans. Temperature is a major factor in coffee beans’ roast time. Beans that are roasted at higher temperatures will achieve their desired roasting temperature more quickly. The roasting method you choose will also affect the time it takes.
DO YOU WATER GREEN COFFEE BEANS BEFORE ROSTING?
The short answer is: No.
The long answer is that you don’t need to wash the beans before beginning your coffee roasting journey. Although you might be worried about the “dusty” coating on fresh beans that you saw when you opened the packaging, remember that your beans are heated to a temperature higher than normal that kills any bacteria or other undesirable elements.
WHAT ADDS FLAVOR TO COFFEE BEAN ROASTS?

You’re likely wondering what the next step is in improving your coffee making skills after you have mastered roasting beans using one of these methods. The answer lies in flavored coffee, dear coffee reader.
Add a flavor oil to freshly roasted beans to elevate your home-roasted brew. After combining the oil and beans, place them in a bowl. Give it a stir with a spoon. Let it sit for 15 minutes. The beans will then have absorbed the flavor and aroma.
We can’t tell how much flavor you should use unless you know what product you have. It is better to have less than you think.
IS ROASTING YOUR OWN COFEE WORTH IT
Roasting your own beans is a great way to ensure freshness in coffee. Coffee beans can only be fresh for a very short time. Roasting your own beans will ensure that you enjoy their full flavor and aroma characteristics before they lose their power.
Are you not feeling like roasting? A coffee subscription is the next best option, even if you don’t have to leave your home. It allows you to order fresh beans and receive them immediately. Find out our guide to the best subscription boxes for coffee here.